Hand Stamped By Heather Wright-Porto: SB Sketch Challenges
Showing posts with label SB Sketch Challenges. Show all posts

Saturday, November 10, 2012

Lacey & Lovely SB5 Sketch Challenge

Happy Saturday!

Saturday's are my stamping days!  I had fun today creating this one!  It took a lot of time because of all the Rhinestones (LOL) but I really do like how it came out and the blue, orange and pink accents on the gray and blank.  Don't you?

  1. So, basically I took a piece of the piece of the Neutrals Designer Series Pack and then cut it.  It is double sided so I then flipped the one side over!  So one piece of paper = two designs. Very cool!  Then adhered it to the white card base using SNAIL adhesive.
  2. Then stamp the flourish swirl using the Flowering Flourishes stamp set.  Yes, some areas I filled in with Basic Black Stampin' Write Marker!
  3. Next, cut the piece of Basic Black card stock and used the Scallop Edge, and adhered it using SNAIL adhesive.
  4. Next, added the ribbon adhering using the SNAIL and Mini Glue Dots.
  5. Next, used the Floral Frame Framelists (3rd size) to die cut the Pacific Point flower (paper from the Brights Designers Series Pack).
  6. Next, stamped the Lacely & Lovely image in Basic Black Ink.  Then used the 2nd Floral Frame (from Floral Frames Framelits) to cut it to a flower shape. Then colored one of the edges with the Pumpkin Pie Stampin' Write Marker.  Next, added Rhinestones near the center, outside where you see the Button.
  7. Adhere the stamped image to the Pacific Point paper using SNAIL, then adhere the flower to the card using Stampin' Dimensionals.
  8. Last but not least I added the Pink buttons (adhering using Mini Glue Dots) and added the Rhinestones to the centers.

Here is the supply list:

  1. Neutrals Designer Series Paper Stacks (12x12): $21.95, Item #117157
  2. Brights Designer Series Paper Stacks (12x12): $21.95, Item #117155
  3. Neutrals Card Stock (so you have the Black and White paper): $6.95, Item #119707
  4. 1/4" Stitched Grosgrain Ribbon Pacific Point, $4.95, Item #126878
  5. 1/4" Stitched Grosgrain Ribbon Basic Gray, $4.95, Item #126879
  6. Brights Designer Buttons, $8.95, Item #119747
  7. Rhinestone Basic Jewels, $4.95, Item #119246
  8. Floral Frames Framelits, $26.95, Item #127012 (requires the Big Shot)
  9. Scallop Edge Border Punch, $15.94, Item #119882
  10. Glue Dots, $4.95. 103683
  11. SNAIL Adhesive, $6.95, Item #104332 (or refill, $4.50, Item #104331)

I hope you enjoyed today's card and hope you over and stamp with us at http://www.StampingAndBloggingBLOG.com and join our Saturday Sketch Challenge #5 (SB5). Thanks!


Saturday, October 27, 2012

Toxic Treats Stepped Up (SB3 Sketch Challenge)

Hey Stampers, it's that time again.....whoo hoo, the weekend, and a Saturday Sketch Challenge for you.

Here is the Challenge for this week and it's SB3 and here is my samples.

There are two versions of the same card. One is simple and one is what is called a Stepped-Up version of the card - which means there is some added elements, techniques, accessories, layers or just added difficulty.

Which do you like best?

Original Toxic Treats SB3


This card simply uses the Basic Black card stock and Pumpkin Pie designer series paper (of the Brights collection).  Scallop Edge punch along the bottom and also scalloped dotted ribbon!

The Framelit piece is colored using the Markers technique but you could have made this card really simply and just stamped it in black only.  But I used Green Gumball, Pumpkin Pie, Summer Starfruit and Basic Black Stampin' Write Markers.


Stepped Up Toxic Treats SB3


My favorite technique to use during Halloween is one that I don't even know if they have an official name for.  See the marks and smudges on the Pumpkin Pie designer series paper?  Those marks were made by me by holding the Pumpkin Pie paper in my hands (you may also lay down on Grid Paper) and then pressing the Basic Black Classic Ink Pad down, forcing some smudging and so of the hard edges to appear.

You may also use some of Stampin' Up!'s background stamp such as Netting to add texture as well. But this look is as unique as you are and you can add as much or as little as you want!

I also added some texture using the Vintage Wallpaper Textured Impressions Folder. I LOVE these folders as they are so easy can really make a simply card "pop".  You could have also used the new Spider Web Folder (but I didn't have that one - LOL) as it would have kept with the Halloween theme maybe a little better.  But the Vintage Wallpaper works too :D

Last but neat least, notice the edges of the Framelit piece. I also took the ink pad and scraped it against the edges. So yes, that look is intentional! LOL.

Be sure to come on over to Stamping and Blogging (the Blog) and check out all the entries for this week's sketch challenge, and hope you'll submit your own samples as well!


Sunday, October 21, 2012

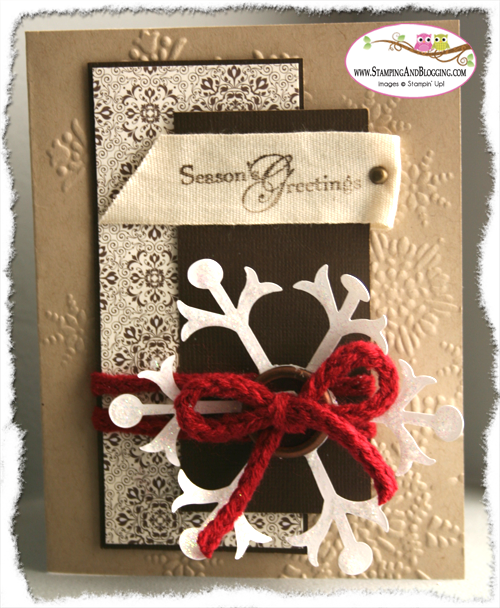
SB2 Vintage Snowflake Card

Hey stamping friends!
LOVE weekends...more time to stamp, and Sandi and I have a new Sketch Challenge for you today!.

SB2

Here is the sketch from Stamping and Blogging.
And here is my take on the card this week. 

I originally had the greeting along the bottom left (that version is loaded to the Gallery on the S&B website), but then moved it to the top right with a piece of hardware as that space then seemed too empty.  But the rest of the sketch is pretty much the same.

The ribbon, hardware and paper are from the Holiday Mini, and of course I had to throw in the Northern Flurry Textured Impressions Folder!  Then added the "red" as the accent color.

What you can't see from this picture is that the snowflake is covered in Dazzling Details to give it some sparkle! Oh and did you notice I stamped right ON the ribbon - How cool is that!

Want to make this a non-holiday card? 

  • replace the snowflake with a stamped image
  • heat emboss to outline the image
  • use some linen twine or chocolate ribbon
  • use more hardware/brads
  • use a different Textured Impressions folder like Square Lattice - that's one of my favorites as well!


Hope you enjoyed this week's card.

Come create with us!
We can't wait to see it! Thanks for playing along with us!   


Thursday, October 18, 2012

SB1 Sketch Challenge - Holiday/Masculine Card


Hi Stampers!

Here is my 2nd sample of this week's sketch challenge. I love the richness of the window sheet paper! Yes, it's a window sheet from the Holiday Mini, but I have dark textured card stock behind it. Additionally, I have a "striped" pattern added because I used SNAIL adhesive instead of glue dots to hold on the window sheet. But I love how it turned out!  It actually coordinates with the striped ribbon, so it all worked out!


SATURDAY SKETCH CHALLENGE
Sandi created this first sketch for us.

It's a pretty simple one to start. but you can dress it up any way you like. Weekly Winners will receive our Challenge Reward Buttons to display on their blogs. You have until Midnight (EST), Friday each week to upload.

A new challenge starts each Saturday.  Here is the current sketch! Would love to see your designs! Go here to upload them. 

Monday, October 15, 2012

New Sketch Challenge!

Hi Stampers!

We have a new weekly event for you to participate in Stamping and Blogging, the Blog!....we sure hope you will give it a try.

SATURDAY SKETCH CHALLENGE Each Saturday we will bring you a sketch and a linky button so you can upload your creations too.

It's a pretty simple one to start. but you can dress it up any way you like. Weekly Winners will receive our Challenge Reward Buttons to display on their blogs. You have until Midnight (EST), Friday each week to upload.

A new challenge starts each Saturday. Sandi and I have shared a couple of samples with you to get you started!.


Here is one of Sandi's samples created with the Christmas Lodge Stamp Set from Stampin' Up! Sandi took creative license and changed the art piece to Circles for this card and she also created a beautiful project sheet for Stamping & Blogging (site) members.


And, here is one of my S&B Sketch Challenge samples! This one is using the Markers technique to give the flowers different colors,  and using the Big Shot and Textured Impressions folder to emboss the background. Use for any occasion, but mine is a simple and clean Sympathy Card using the Thoughts & Prayers stamp set from Stampin' Up!

Those are our shares, so have fun creating and then CLICK HERE to add yours because we would love to see what you come up with!

CLICK HERE to go to our Stamping and Blogging blog and submit your artwork! Remember, weekly winners get badges for their blog!